전자공작/Sensor
[Sensor#1] CO2센서 MH-Z14A
절망로정말적
2022. 8. 29. 23:41
1. MH-Z14A
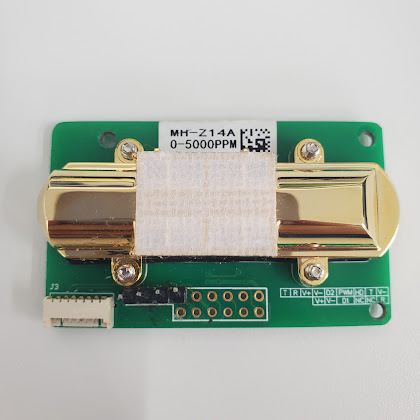
아마존에서 구입한 CO2센서 MH-Z14A. 핀 위치는 제품에 따라 미묘하게 다른 경우도 있다.
비슷한 모델로 MH-Z19 있음😐
2. 아두이노 구동

결선핀
T → A0
R → A1
V+ → VCC(5V)
V- → GND
#include <SoftwareSerial.h>
SoftwareSerial mySerial(A0, A1);
byte cmd[9] = {0xFF,0x01,0x86,0x00,0x00,0x00,0x00,0x00,0x79};
byte response[9];
String ppmString = " ";
void setup() {
Serial.begin(9600);
mySerial.begin(9600);
}
void loop()
{
mySerial.write(cmd,9);
mySerial.readBytes(response, 9);
byte chck = 0;
if(response[8] == (0xff&(~(response[1]+response[2]+response[3]+response[4]+response[5]+response[6]+response[7]) + 1))){
Serial.println("OK");
}
else {
Serial.print("chksum : ");
Serial.println(response[8],HEX);
Serial.print("read : ");
Serial.println(0xff&(~(response[1]+response[2]+response[3]+response[4]+response[5]+response[6]+response[7]) + 1),HEX);
while(mySerial.available() > 0){
mySerial.read();
}
}
int ppm = (response[2] << 8)|response[3];
ppmString = String(ppm); //int to string
Serial.print("PPM ");
Serial.println(ppm);
delay(2000);
}

3. pro micro에서 실행시

아두이노 프로 마이크로에서 실행시 출력값이 제대로 나오지 않았다.
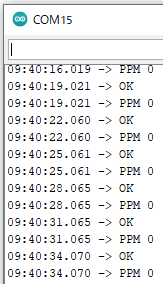
MH-Z14A의 사용전압이 4.5~5.5V인데 프로 마이크로의 출력전압을 테스터로 확인해보니 4.25~4.60V 였으니 전압부족해서 센서가 정상적으로 동작하지 못한 것 같다. uno의 경우 4.92~5.05V
